|
Set All Cabs to Off
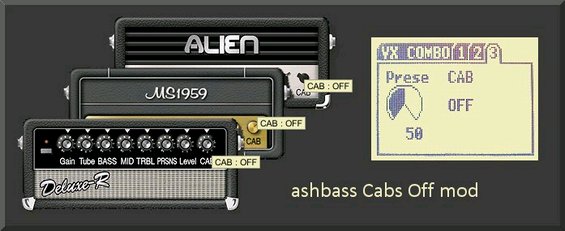
I prefer my amp models to have their cabs turned off. If I want a cab, I'll get one. But I want them off for starts so I can hear what the models sound like through my gear, through my cabs. Annoyingly for me, whenever I select a new amp model to play with, it automatically has its cab emulation turned on. Then I have to press page, page, page, and turn button two turn, turn, turn, to turn the cab off. But not anymore. Here are two processes that will change the amp models in your Zoom G3v2/G3X or Zoom G5 so that their cabs are off by default. First, you'll need to update the amps that are used in your existing patches. For that, use The Effecturator 2000. This is a small freeware windows program that opens Edit&Share patch group files so that you can make global/mass changes to the amps (like "turn all amp cabs off"), drives, and reverbs that are included in the patch group. If you'd rather just import a ready-made patch group file into Edit&Share, you can download one here.
Second, you'll need to update the Zoom pedal itself so that whenever a new amp is dialed up, its cab is automatically off. I looked inside the most recent firmware update files from Zoom and found where the cabs were specified for the amps. Then I updated the updater files so that the amps would have "cab off" instead of "cab on." My updater files do the exact same things that the Zoom updater files do, except that mine have different amp cabs specified. No patches will be overwriten. While I've wanted Cabs Off by default since I got my first G3, my motivation to do something about it came from the Zoom Gear & Home Recording Forum. I'm using the freeware hex editor called Hexplorer. I've included links to Zoom's original firmware updater files alongside my updated updater files. If your G3 or G3X or G5 has not yet been updated to Zoom's latest firmware, you should do that before you run one of my updaters. My updaters have worked perfectly for me several times already for both my G5 and G3X. I cannot and do not guarantee that they will work for you similarly. Use them at your own risk. If by rare chance something goes wrong with my updater you can simply run Zoom's version to get your pedal back in business.
G5 Instructions: 1. Download the ashbass updater file to your computer. 2. Turn the G5 power off. 3. Connect the G5 to your computer with a usb cable. 4. Press and hold down foot switches 1 and 2. 5. Turn the G5 power on. 6. You should see a screen reading "Ready for Version Update!" 7. At your computer, run the ashbass CabsOff updater file. 8. A "Zoom G5 System Updater" screen will appear. 9. Set both MIDI dropdown lists to the same Zoom item. 10. Click the Execute button. 11. Click the Exit button when told that the version update is complete. 12. Restart your G5 13. Check out your new "cab-less" amps. 14. SCORE!!! G3v2 and G3X Instructions: 1. Download the ashbass updater file to your computer. 2. Unplug any USB from the G3/X. 3. Set the G3/X Power switch to Off. 4. Press and hold down the two SCROLL (or Patch Select) buttons. 5. Plug USB cable into the G3/X. The other end should already be plugged into your computer. 6. You should see a screen reading "Ready for Version Update!" 7. At your computer, run the ashbass CabsOff updater file. 8. A "Zoom G3v2/G3X System Updater" screen will appear. 9. Set both MIDI dropdown lists to the same Zoom item. 10. Click the Execute button. 11. Click the Exit button when told that the version update is complete. 12. Restart your G3/X. 13. Check out your new "cab-less" amps. 14. SCORE!!! |
