 03-03-2012, 04:31 PM
|
#1 (permalink) |
|
Senior Member
Join Date: Nov 2011
Location: Halifax, Canada
Posts: 762
Thanks: 32
Thanked 10 Times in 5 Posts
|
Epiphone Valve Junior Mods
I have just finished the second round of mods on my EVJ
thanks to some excellent advise and support from TWANG. There are a ton
of things I have now done and the tone is light years ahead of where
the amp started in its stock configuration.
If there is interest I will describe the mods and how they effected the tone.
__________________
Guitars: Epi LP '56 Goldtop (50's Wiring, SD SP90-2 Hot Bridge) Epi SG Goth (50's Wiring, SD SH-1 '59 Bridge, SD SH-6 Duncan Distortion Neck) Epi Dot Partscaster Esquire (Eldred Mod) CV 50's Pine Tele Fender Classic Series '50s Esquire 
Last edited by Batman; 03-03-2012 at 07:41 PM. |


|


|
| The Following 5 Users Say Thank You to Batman For This Useful Post: |
|
03-03-2012, 05:02 PM
|
#5 (permalink) |
|
Senior Member
Join Date: Nov 2011
Location: Halifax, Canada
Posts: 762
Thanks: 32
Thanked 10 Times in 5 Posts
|
Re: Epiphone Valve Junior Mods
OK, I've just got to get my pics and clips setup. . .
Life is interferring in the form of weekend chores but I will start this ASAP.
__________________
Guitars: Epi LP '56 Goldtop (50's Wiring, SD SP90-2 Hot Bridge) Epi SG Goth (50's Wiring, SD SH-1 '59 Bridge, SD SH-6 Duncan Distortion Neck) Epi Dot Partscaster Esquire (Eldred Mod) CV 50's Pine Tele Fender Classic Series '50s Esquire
|
|
|
|
|
03-03-2012, 05:53 PM
|
#6 (permalink) | |
|
Senior Member
Join Date: Apr 2009
Location: The Evergreen State
Posts: 3,002
Thanks: 42
Thanked 35 Times in 16 Posts
|
Re: Epiphone Valve Junior Mods
Did you do the JP-1 jumper mod? That's the only thing I've done to
the VJ. I kind of want to mod it further, but I like what it does, as
is.
__________________
 Quote:
|
|
|
|
|
|
03-03-2012, 05:58 PM
|
#7 (permalink) | |
|
Senior Member
Join Date: May 2010
Location: Ashton-Under-Lyne, England.
Posts: 897
Thanks: 38
Thanked 0 Times in 0 Posts
 |
Re: Epiphone Valve Junior Mods
Quote:
 . . 
|
|
|
|
|
|
03-03-2012, 06:28 PM
|
#8 (permalink) |
|
Senior Member
Join Date: Nov 2011
Location: Halifax, Canada
Posts: 762
Thanks: 32
Thanked 10 Times in 5 Posts
|
Re: Epiphone Valve Junior Mods
I bought the EVJ about three weeks ago and it is an OK little amp on
its own. It has a single volume knob, OK gain, harmonics and
articulation in its stock configuration but after playing it for awhile I
was dissatisfied with the overall sound. It's muddy and a little flubby
when pushed; it sounds like it's wrapped in a wet blanket. It is
however an excellent candidate for modification. As a noob Amp modder, I
was just the hands and ears on this project; the credit for the
corrected component values goes to TWANG. What an incredible resource
and a great guy to work with!
I can’t stress enough the importance of working carefully with a tube amp; capacitors can store a potentially lethal charge. Drain the caps prior to doing any work on an amp. General Safety Tips and how to drain the caps can be read here. In this picture, I am draining the caps using a probe I built from the description in the preceding document. It is clipped to one of the Output Transformer bolts (Star Ground is a better location but this was an easier location to photograph) with the probe on Pin 9 of the EL84. I leave this in place for a couple of minutes while I get everything else in order then check voltages with my DMM. 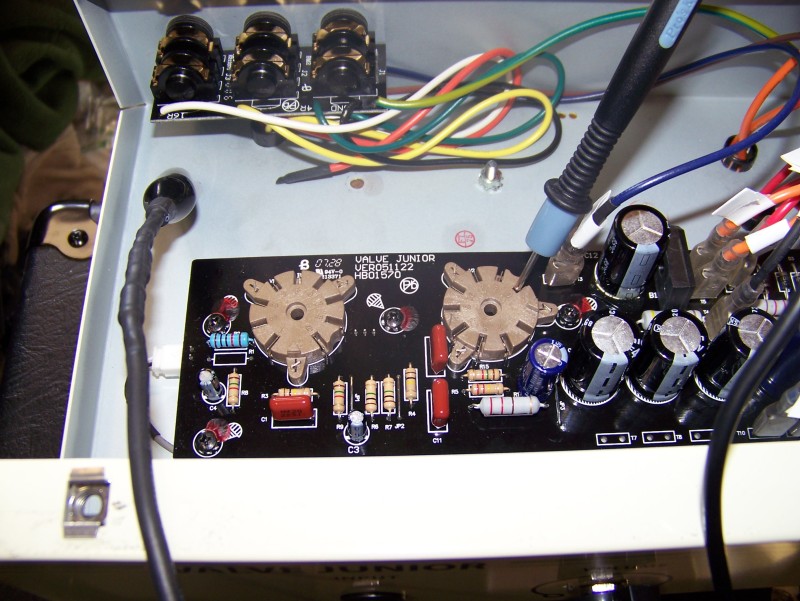 This document is a good introduction to the various components and how the circuit works. This document shows the schematic for all three versions of the VJ. This document shows the schematic for the Mods that have been done. (Ignore the heater stuff unless you have V1 of the EVJ) The initial mods can be broken down into five primary areas; Design Correction Output Transformer Replacement Better Filtering Gain Increase Tone Improvement The second round of mods add Negative Feedback, a tweed style tone control and a Master volume. I’ll cover the mods in sections and attempt to answer questions as we go along. Hopefully TWANG can jump in if I get over my head with the technical explanations.
__________________
Guitars: Epi LP '56 Goldtop (50's Wiring, SD SP90-2 Hot Bridge) Epi SG Goth (50's Wiring, SD SH-1 '59 Bridge, SD SH-6 Duncan Distortion Neck) Epi Dot Partscaster Esquire (Eldred Mod) CV 50's Pine Tele Fender Classic Series '50s Esquire
Last edited by Batman; 03-03-2012 at 09:17 PM. |
|
|
|
|
03-03-2012, 06:30 PM
|
#9 (permalink) | |
|
Senior Member
Join Date: Nov 2011
Location: Halifax, Canada
Posts: 762
Thanks: 32
Thanked 10 Times in 5 Posts
|
Re: Epiphone Valve Junior Mods
Quote:
__________________
Guitars: Epi LP '56 Goldtop (50's Wiring, SD SP90-2 Hot Bridge) Epi SG Goth (50's Wiring, SD SH-1 '59 Bridge, SD SH-6 Duncan Distortion Neck) Epi Dot Partscaster Esquire (Eldred Mod) CV 50's Pine Tele Fender Classic Series '50s Esquire
|
|
|
|
|
|
03-03-2012, 06:37 PM
|
#10 (permalink) |
|
Senior Member
Join Date: Nov 2011
Location: Halifax, Canada
Posts: 762
Thanks: 32
Thanked 10 Times in 5 Posts
|
Re: Epiphone Valve Junior Mods
Design Correction
The first change made was to correct a design flaw in the VJ; the lack of a screen grid resistor. If the EL84 tube were to blow in a bad way, a screen grid resistor would prevent the tube shooting voltage through the amp and causing serious damage! Looking underneath the board there is a trace from pin 9 on V2 (EL84) which runs to a junction of three solder joints (R12, R13 and C7). File this trace through so there is at least a 1/4" break on the trace. Solder a 1K 1W resistor from pin 9 of V2 to one of the solder pads; R12, R13 or C7. This work is done under the board. 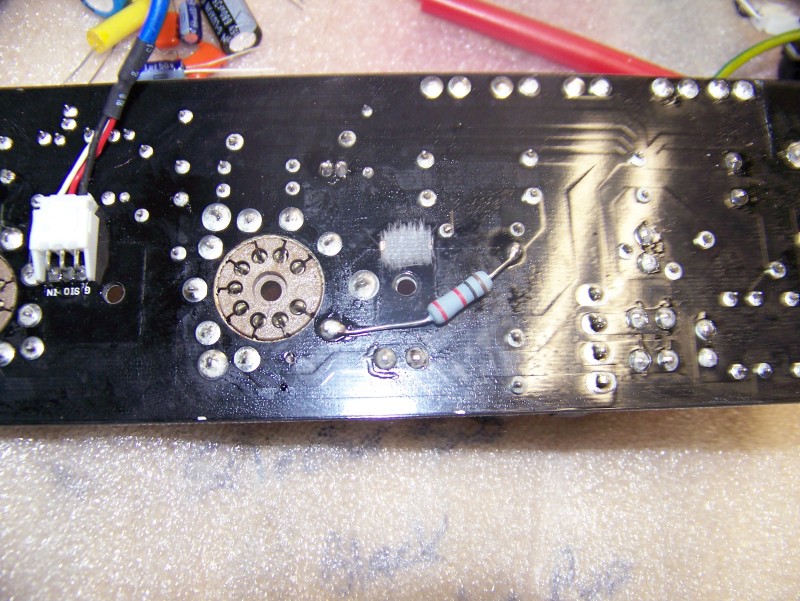 A better way to do this would be to drill two small holes before and after the break in the trace, remove some of the epoxy on the trace around these holes and add the resistor on the top side of the board. I found this out after I had completed this mod and opted not to reverse the change.
__________________
Guitars: Epi LP '56 Goldtop (50's Wiring, SD SP90-2 Hot Bridge) Epi SG Goth (50's Wiring, SD SH-1 '59 Bridge, SD SH-6 Duncan Distortion Neck) Epi Dot Partscaster Esquire (Eldred Mod) CV 50's Pine Tele Fender Classic Series '50s Esquire
Last edited by Batman; 03-03-2012 at 07:46 PM. |
|
|
|
|
03-04-2012, 11:19 PM
|
#11 (permalink) |
|
Senior Member
Join Date: Nov 2011
Location: Halifax, Canada
Posts: 762
Thanks: 32
Thanked 10 Times in 5 Posts
|
Re: Epiphone Valve Junior Mods
Output Transformer Replacement
When I approached TWANG about doing some mods he had some very specific recommendations about the Output Transformer. The Output Transformer (OT) on the VJ is too small. Although mine (version 3) had a 5.2K primary the first versions had 7K primaries which are even worse. Although this is the biggest expense, it is great to do first as it has a huge impact on both tone and headroom. His suggestion was to go with a Triode Electronics Classic Tone OT (15 Watt, 4, 8 & 16 ohm taps). There is a Hammond dealer nearby so I asked about using a Hammond 125ESE OT (15 Watt, 4, 8 & 16 ohm taps) instead. TWANG suggested that the Hammond is a great choice as it has huge tone but is more 'Audiophile' and expensive compared to the Classic Tone which is less expensive and gives a smoother tone. I went with the Hammond as the increased cost compared to the Triode was offset by the cost to have the Triode shipped. These are both well bigger than required for a 5 watt amp but they add huge tone! To replace the OT with a Hammond 125ESE Remove the chassis from the cab, drain the caps then remove the hex nuts on all three speaker jacks and the CB will slide into the chassis. Carefully remove the hot glue from around the four wires (Red, Orange, Black and Brown) that lead to the OT. De-solder these wires from the board. Leave the Green/Yellow wire running to the star ground attached. Then unplug the white and yellow wires running to T3 & T4. The original OT is now disconnected and can be unbolted and removed from the chassis. The spade connectors on the Yellow and White wires will need to be reused for the new OT. I slid the boots up the wire then cut them off about 5/8" from the connector. Strip the remaining wire and splice them onto the Blue and Brown wires on the Hammond OT. Don't forget to slide the boots and some shrink wrap tubing on the new wires before you solder. Shrink wrap the wires after they are soldered and slide the boots back into position. You will be removing all of the spade connectors repeatedly in the upcoming steps so I suggest you mark the connector number of every wire on its boot with a Sharpie marker.  A new hole will need to be drilled in the chassis to accept the new OT as it is much larger than the original (see picture below). To mark the new hole, attach the new OT to the chassis in the hole closest to the edge of the chassis using the original bolt. Line the OT up and mark the position of the new hole. Remove the OT, center punch and drill the new hole. Insert the wires from the OT through the grommet and bolt the OT to the chassis. 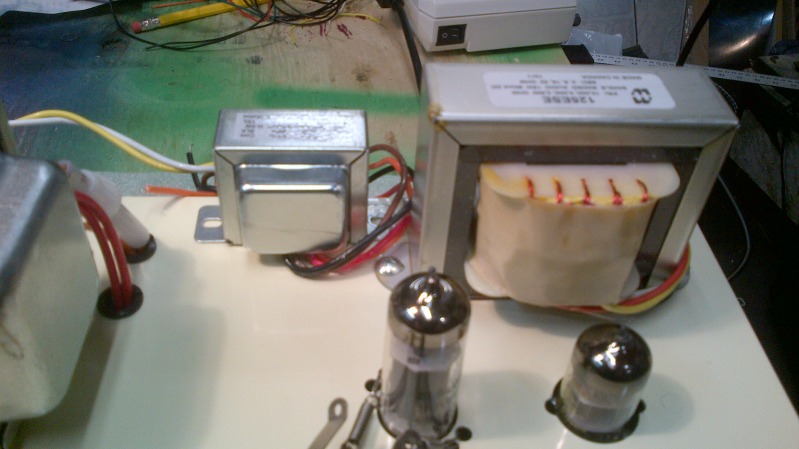 Solder the White wire to the 16 ohm tap, the Yellow wire to the 8 ohm tap, the Green wire to the 4 ohm tap and the black wire to the ground. Reinstall the Speaker Jack CB in the chassis and tighten the three hex nuts. Ignore the second yellow wire in the picture below; it is the lead for the NFB circuit. 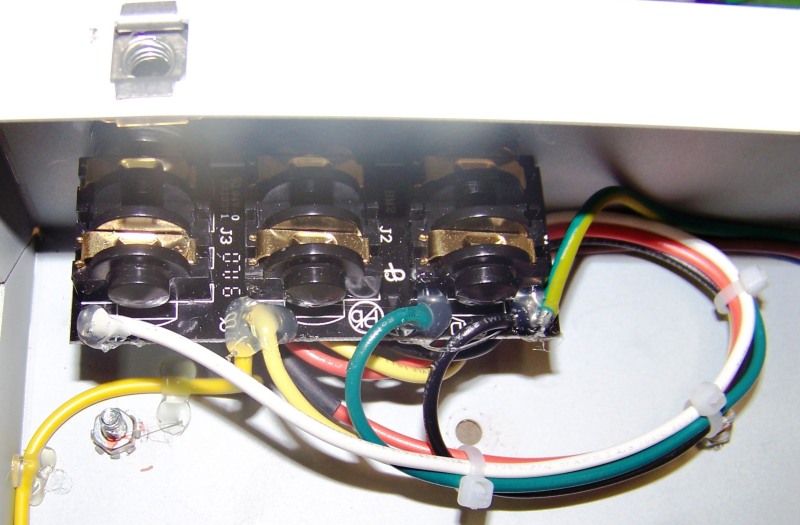 Finally, reattach the brown wire to T3 and the blue wire to T4. At this point I connected the speaker to the 4 ohm tap plugged in and tested the amp. The difference is HUGE. There was an increase in clean headroom and a massive improvement in overall tone, note definition and picking dynamics.
__________________
Guitars: Epi LP '56 Goldtop (50's Wiring, SD SP90-2 Hot Bridge) Epi SG Goth (50's Wiring, SD SH-1 '59 Bridge, SD SH-6 Duncan Distortion Neck) Epi Dot Partscaster Esquire (Eldred Mod) CV 50's Pine Tele Fender Classic Series '50s Esquire
|
|
|
|
|
03-04-2012, 11:32 PM
|
#12 (permalink) |
|
Wandering Child
 Join Date: Feb 2010
Location: Keene, Nh.
Posts: 8,630
Thanks: 133
Thanked 224 Times in 56 Posts
|
Re: Epiphone Valve Junior Mods
Cool thread bro. Thanks for taking the time to detail everything.
__________________
"Distortion, bless it's fuzzy woolen socks" Dave Hunter "Yesterdays anger, is the sadness of today" Warren Haynes 
|
|
|
|
|
03-05-2012, 12:19 AM
|
#13 (permalink) |
|
Senior Member
Join Date: Nov 2011
Location: Halifax, Canada
Posts: 762
Thanks: 32
Thanked 10 Times in 5 Posts
|
Re: Epiphone Valve Junior Mods
No sweat man.
 Just giving back what was given to me for free. . . If I can arrange it, I'll bring it to VT in June when I'm down. All depends on whether one of my buddies brings his car or not.
__________________
Guitars: Epi LP '56 Goldtop (50's Wiring, SD SP90-2 Hot Bridge) Epi SG Goth (50's Wiring, SD SH-1 '59 Bridge, SD SH-6 Duncan Distortion Neck) Epi Dot Partscaster Esquire (Eldred Mod) CV 50's Pine Tele Fender Classic Series '50s Esquire
|
|
|
|
|
03-05-2012, 11:02 AM
|
#14 (permalink) |
|
Senior Member
Join Date: Nov 2011
Location: Halifax, Canada
Posts: 762
Thanks: 32
Thanked 10 Times in 5 Posts
|
Re: Epiphone Valve Junior Mods
The following changes increase filtering and bass response
C6 (22uF Filter Capacitor) - Replace C6 with a 47uF 450V capacitor. (Largest cap bottom right of picture) This will increase filtering and decrease noise. This translates to much better lows. Filter caps convert the rippled DC exiting the rectifier into smooth DC and they store charge. The more capacitance a filter cap has, the smoother the treated DC will be and the more charge it can store. Smoother DC translates to a quieter circuit in the 120Hz range. The amount of stored charge relates to how much power is available to the circuit when it is needed to reproduce bass notes. More charge equals more punch. The first filter cap supplies the output transformer and power tube plate. The VJ uses a 22µF first filter cap, which is pretty standard for amps with tube rectifiers, but low for Solid State rectified circuits like the VJ. C5 (22uF Cathode Capacitor) – Replace C5 with a 470uF 50V capacitor. (Smallest cap at the Left end of the row of caps at the bottom of the picture) This change will 'seem' to increase bass. In fact, it just tightens up the lows and deletes a lot of mush. This capacitor is necessary to stabilize cathode biased power tubes. Higher values have more of a stabilizing effect than lower values. The stock 22µF cap is low compared to most modern circuits, but is very common in vintage circuits—especially tweed amps. It can be replaced with any value from 470µF to 1000µF. Higher values result in a stiffer power amp and can make an amp respond similarly to a fixed bias power amp. This cap also has an effect on frequency response, and some people feel higher values contribute more bass to a circuit. This is likely only because of the stiffening effect, because even a 10µF cap is full-range when combined with a typical cathode resistor. This means any cap at or above 10µF is full-range and contributes nothing to the theoretical frequency response of the amp, but higher values can contribute to the stability, and therefore stiffness, of the power amp. 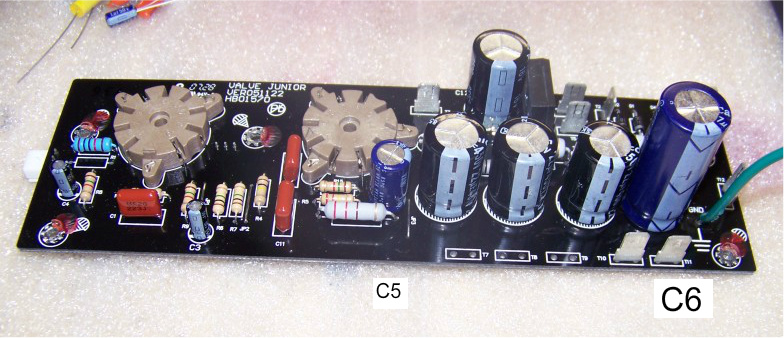 I recommend that you reassemble the amp and play it after each and every change. This is tedious but it lets you know what each step has done to the overal tone and that the amp still works after the change. This is especially important when changing these electrolytic capacitors as they are polarized and must be oriented correctly (as per the picture above) in order for the circuit to function.
__________________
Guitars: Epi LP '56 Goldtop (50's Wiring, SD SP90-2 Hot Bridge) Epi SG Goth (50's Wiring, SD SH-1 '59 Bridge, SD SH-6 Duncan Distortion Neck) Epi Dot Partscaster Esquire (Eldred Mod) CV 50's Pine Tele Fender Classic Series '50s Esquire
|
|
|
|
|
03-05-2012, 11:31 AM
|
#15 (permalink) |
|
Senior Member
Join Date: Nov 2011
Location: Halifax, Canada
Posts: 762
Thanks: 32
Thanked 10 Times in 5 Posts
|
Re: Epiphone Valve Junior Mods
When working on PCB boards it is very easy to damage solder pads by
using too much heat or applying too much force removing components. Work
carefully and be patient. I use a temperature controlled solder station
but any good quality 25-watt soldering iron will work. NEVER use a high
wattage soldering gun on delicate electronics!
What works the best for me for removing resistors is to grasp one of the leads with a pair of medical forceps, apply heat to the solder pad on the bottom of the board while GENTLY applying SLIGHT pressure away from the board with the forceps. Once the first lead is free, repeat for the second lead. I then use a solder pump to remove the excess solder from the solder pad. You can also use a solder bulb or de-solder wick to remove the old solder. I prefer a pump but YMMV. The best choice for replacement resistors is 1% Metal Film Resistors (MFR). In my case, I used what I had on hand which was Carbon Film Resistors. The only resistor that should be Carbon Composition is R4 but more on that later. The following changes will open up the front end of the Amp, increase gain and improve the signal to noise ratio R2 (68K Grid Resistor) - Pull and replace with a 10K 1W resistor. R2 is commonly located on the other side of R1, where it interacts with the Miller capacitance of the tube grid to reduce or eliminate radio frequency interference (RFI). Its stock location before R1 creates a voltage divider that causes a 50% loss of input signal as if you had plugged into a LO input jack. In addition to changing the value, we are also going to move R1 to the input jack to place R1 before R2 in the circuit. In this picture, R1 has been removed and R2 has been replaced with a 10k Carbon Film Resistor. (Left of the pre-amp tube socket) 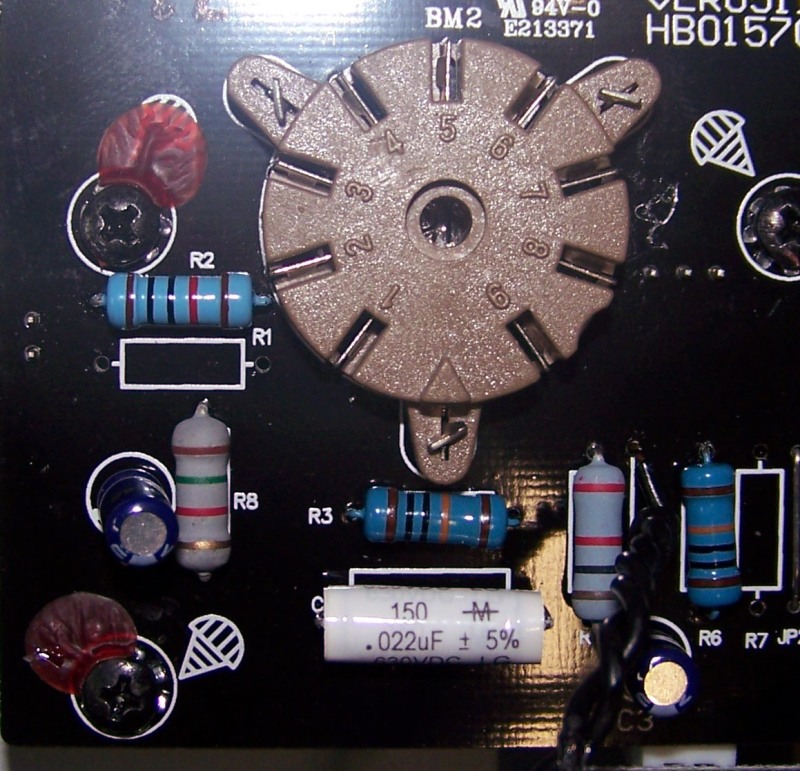 R1 (68K Pull Down Resistor) - Pull and replace with a 1Meg 1W resistor. Remove R1 from the board and put the new resistor over the input jack from hot to ground; leave R1 off the board entirely. The purpose of this resistor is to reference the tube grid to ground, which sets the initial impedance of the circuit. This is normally 1M, so the stock 68K is a little odd. Epiphone probably chose 68K because of the value and location of R2, which causes the aforementioned loss of signal. Changing this resistor to 1M will significantly increase the amp’s overall gain and improve its signal to noise ratio. I made two small loops in the leads of the resistor and crimped them around the exposed leads protruding through the solder pads of the input jack. It is important to solder this resistor on the correct side of the input jack. See the picture below. 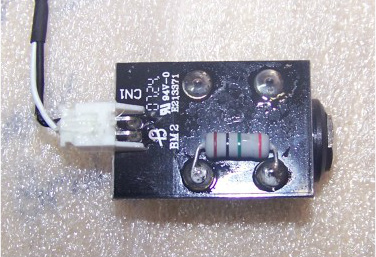
__________________
Guitars: Epi LP '56 Goldtop (50's Wiring, SD SP90-2 Hot Bridge) Epi SG Goth (50's Wiring, SD SH-1 '59 Bridge, SD SH-6 Duncan Distortion Neck) Epi Dot Partscaster Esquire (Eldred Mod) CV 50's Pine Tele Fender Classic Series '50s Esquire
|
|
|
|
|
03-06-2012, 07:03 PM
|
#17 (permalink) |
|
Senior Member
Join Date: Apr 2009
Posts: 3,340
Thanks: 0
Thanked 16 Times in 5 Posts
|
Re: Epiphone Valve Junior Mods
TWANG has endless fun with EVJs and does great work.
I have two EVJs (heads), but have never been tempted to add f&ckwithage personally. One of the two heads has the entire Mercury Magnetics kit, including the additional 6V6 socket (you can use the head with the original EL84, the 6V6 or both together). The kit essentially replaces the original power and output transformers with MM bits, adds a choke and reworks the circuit a bit. MM originally developed the kit only as a demo tool, to show what a transformer change can wring out of a relatively simple amp. The kit itself is expensive ($290) and installation can run another $100+, which is mind-boggling for a head that originally cost me $99 at retail. But the result is an essentially boutique amp head with amazing sound. I get to visit it occasionally; it spends most of its time on "borrow" for recording. It's that good. I've kept the other head stock; it's easiest to explain what the mods do if you can simply plug both in and hear the difference for yourself. Mercury Magnetics -- Valve Jr Transformer Demo Project |
|
|
|
|
03-06-2012, 11:41 PM
|
#18 (permalink) |
|
Senior Member
Join Date: Nov 2011
Location: Halifax, Canada
Posts: 762
Thanks: 32
Thanked 10 Times in 5 Posts
|
Re: Epiphone Valve Junior Mods
The following changes increase preamp inter-stage gain
R6 (1W 1 Meg Attenuating Resistor) - Replace R6 with a 1W 100K resistor. R6 and R7 create another voltage divider which reduces the signal to the second pre-amp stage by 50%. These resistors are not necessary strictly speaking but they help limit the amount of signal going into the second triode of the preamp tube. This gives the amp some clean headroom and emphasizes power tube overdrive over preamp overdrive. Reducing the value of these resistors will increase pre-amp gain and somewhat reduce the clean headrooom. As a note; the lower the values of R6 and R7, the brighter the tone. R7 (1W 1 Meg Attenuating Resistor) - Replace R7 with a 1W 100K resistor. This resistor dumps signal to ground; the higher the resistor the greater the gain loss. R7 is actually wired in parallel witht he volume pot which effectivly makes the 1 Meg volume pot a 500k pot. *Edit* I used several values for both R6 and R7 and in the end opted to remove R7 all together and leave R6 100K.
__________________
Guitars: Epi LP '56 Goldtop (50's Wiring, SD SP90-2 Hot Bridge) Epi SG Goth (50's Wiring, SD SH-1 '59 Bridge, SD SH-6 Duncan Distortion Neck) Epi Dot Partscaster Esquire (Eldred Mod) CV 50's Pine Tele Fender Classic Series '50s Esquire
|
|
|
|
|
03-06-2012, 11:50 PM
|
#19 (permalink) |
|
Senior Member
Join Date: Nov 2011
Location: Halifax, Canada
Posts: 762
Thanks: 32
Thanked 10 Times in 5 Posts
|
Re: Epiphone Valve Junior Mods
With the preceding changes done the amp has been improved
significantly. A design flaw has been corrected with the addition of a
screen grid resistor, signal into the amp, inter-stage gain, filtering,
bass response and the tone have been vastly improved.
Before the rest of the changes to re-voice the amp are done, the voltages at V1 and V2 need to be checked and corrected. V2 Pin 7 (Plate) should not exceed 320V and V2 pin 9 (Grid) should be approximately 10V less than pin 7. This check is done with the amp powered, tubes installed and the speaker connected. Extreme caution is required when working on a live amp! You should keep one hand in your pocket while checking voltages. Below are my readings. EL84 Pin 9 – 308 V Pin 7 – 337 V Pin 5 – 6.71 V Pin 3 – 9.45 V 12AX7 Pin 8 – 1.50 V Pin 6 – 193 V Pin 5 – 6.71 V Pin 4 – 6.71 V Pin 3 – 1.44 V The Plate voltage (pin 7) of 337 Volts is too high. Running voltages above 320 V will reduce tube life and hurt the tone of the amp. To lower the grid and plate voltages, R10 (220 ohm) needs to be replaced with a higher value. I used a 1 K 5W wire wound resistor. After replacing R10 (1K 5W) EL84 Pin 9 – 284 V Pin 7 – 311 V Pin 5 – 6.86 V Pin 3 – 8.63 V 12AX7 Pin 8 – 1.39 V Pin 6 – 177 V Pin 5 – 6.88 V Pin 4 – 6.88 V Pin 3 – 1.34 V This voltage correction paid off immediately; the overall tone was sweeter and the harmonic content of the overdrive was enhanced. Although the heater voltages (12AX7 Pins 4 & 5) are somewhat high, it is fine to leave them alone. Heaters are usually 6.3V +/- 10% which puts my 6.88V at a high but acceptable value. . .they should be less than 6.9V. To reduce the heater voltages, file the (+) heater trace and put in a 2W 0.47 ohm resistor. (that should drop about 0.5V) I opted to leave the heaters alone.
__________________
Guitars: Epi LP '56 Goldtop (50's Wiring, SD SP90-2 Hot Bridge) Epi SG Goth (50's Wiring, SD SH-1 '59 Bridge, SD SH-6 Duncan Distortion Neck) Epi Dot Partscaster Esquire (Eldred Mod) CV 50's Pine Tele Fender Classic Series '50s Esquire
|
|
|
|
|
03-07-2012, 12:03 PM
|
#20 (permalink) |
|
Senior Member
Join Date: Nov 2011
Location: Halifax, Canada
Posts: 762
Thanks: 32
Thanked 10 Times in 5 Posts
|
Re: Epiphone Valve Junior Mods
These changes will re-voice the amp and also add more gain
C3 (22uF Cathode Capacitor) - Replace this with a 1uF to 4.7uF 35 V capacitor. A cathode capacitor functions to increase the gain of a triode by letting certain frequencies pass unattenuated. C3 interacts with R9 to control the frequency response of the second gain stage as it relates to bass. Generally speaking, lower values of C3 will result in less bass. C3 and C4 are changed at the same time The value of these capacitors required some experimentation. I started with 1uF and moved up to 4.7uF playing the amp for a couple of hours after each change with Humbucker, P90 and Single Coil equipped Guitars. I was looking for a good balance and eventually settled on 1uF for both C3 and C4. C4 (22uF Cathode Capacitor) - Replace with 1uF to 4.7uF 35 V capacitor. See above. R3 (1K Plate Resistor) - The plate resistor drops the voltage and limits the current to the anode of the first triode of the 12AX7. Its value is 100K, which is very common. This resistor interacts with the cathode resistor (R8) to set the operating point of the tube. There is no need to change this resistor unless you want to increase the gain of the 1st triode, in which case you can change it to 220K and also change R8 to 1.5K. This combination extracts the most gain you can possibly get from a single triode of a 12AX7. But there are plenty of other (and better) places to adjust the gain in this circuit. I left this one stock. R4 (1K Plate Resistor) - The plate resistor drops the voltage and limits the current to the anode of the second triode of the 12AX7. This resistor can be a 1W 90K to 1W 100K Carbon Composition, Carbon Film or Metal Film. TWANG's suggestion was to go with Carbon Composition in this position as this is supposed to add 'mojo' due to the way the old Resistors freak out over voltages. This resistor interacts with the cathode resistor (R9) to set the operating point of the tube. R8 (1 W 2.2k Cathode Resistor) - Replace with 1 W 1.5 k Metal Film or Carbon Film resistor. The cathode resistor interacts with the plate resistor to set how much current the triode can draw or the bias of the triode. Lower values allow the triode to draw more current and bias the triode warmer. 1.5K with a 100K plate resistor puts the triode approximately in the middle of the bias range which yeilds smooth and warm overdrive. R9 (1 W 2.2k Cathode Resistor) - Replace with 1 W 1.5k Metal Film or Carbon Film resistor. This triode differs from V1a in that it can be overdriven by V1a, yielding preamp distortion. Lower values here overdrive more easily and yield a warmer, smoother tone. Higher values allow the stage to overdrive later but the tone will lean toward edgy or grainy or buzzy distortion. A 1.5K resistor is a good compromise and is prevalent in Fender amps. I played with this value a little and found that I prefer a 1W 1K Carbon Film resistor in this position. C1 (.022uF 600V Input Coupling Cap) - Change this to a Mallory 150 or Sprague 'Orange Drop' .022uF 600V cap. Mallory will give a more Marshall flavor to the tone while Sprague will give a more Fender flavor. C2 (.022uf 600V Output Coupling Cap) - Change this to a Mallory 150 or Sprague 'Orange Drop' .022uF 600V cap. See above. That finished my initial round of mods. After playing the amp and A/B ing it with an unmodified VJ I am hugely impressed with the changes. By comparison, the unmodded amp sounds muddy and dull, with a flabby bottom end; like it's wrapped in a wet blanket. The modded amp sounds sweet, has much more harmonic detail, has a nice tight bottom end and is far more sensitive to pick dynamics. Where the sweet spot of the original is somewhere around 1 o'clock on the volume, the mods change that to anywhere between 9 and 3 o'clock depending on how much volume and gain you want. This amp now has a ton more gain and less clean headroom. Although I don't consider this to be an entirely bad thing, it does limit what you can play if you are playing with a band. My second round of mods - NFB, Tweed Tone Stack and Master Volume are to follow. These mods give the amp a lot more flexability. Here is a shot of the inside of the amp. The Pot on the Left is the MV, Middle is the Tweed Tone and Right is Gain (the original Volume control). The switch on the far right is the NFB circuit. 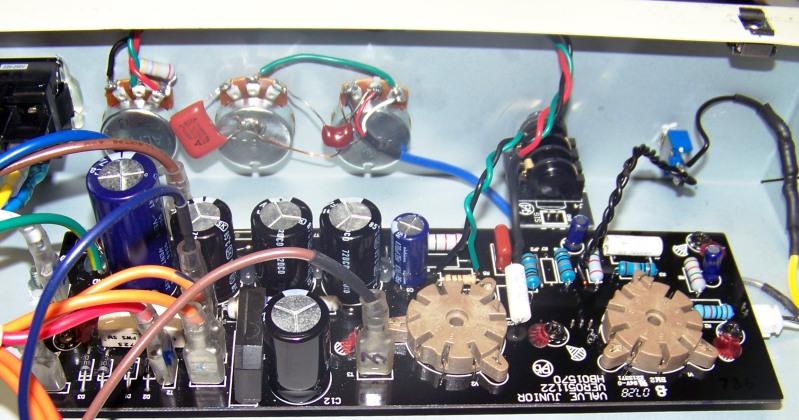 Here is the front of the chasis. The knobs are temporary while I wait for black Chicken Head knobs to arrive. 
__________________
Guitars: Epi LP '56 Goldtop (50's Wiring, SD SP90-2 Hot Bridge) Epi SG Goth (50's Wiring, SD SH-1 '59 Bridge, SD SH-6 Duncan Distortion Neck) Epi Dot Partscaster Esquire (Eldred Mod) CV 50's Pine Tele Fender Classic Series '50s Esquire
Last edited by Batman; 03-07-2012 at 04:31 PM. Reason: Added R3 and R4 descriptions |
|
|
|
|
03-07-2012, 03:33 PM
|
#21 (permalink) |
|
Senior Member
Join Date: Nov 2010
Location: Mesa, AZ
Posts: 145
Thanks: 0
Thanked 1 Time in 1 Post
|
Re: Epiphone Valve Junior Mods
Batman, that was a very nice write-up. I've made similar changes to
my Black Heart Little Giant (with the help of Lyle Caldwell). I
understand the LG was designed by the same guy who designed the VJ. I
describe my changes here, with before and after clips: Here's my Blackheart Little Giant video WITH Lyle's Marshall mods
I just may have to change my power tube cathode cap to stiffen up my bass, as I still get some "farty-ness" when highly over-driven. |
|
|
|
|
05-18-2012, 09:28 PM
|
#22 (permalink) |
|
Senior Member
Join Date: Feb 2009
Location: North of Toronto
Posts: 3,878
Thanks: 70
Thanked 116 Times in 49 Posts
|
Re: Epiphone Valve Junior Mods
I may need to consult you for this mod, but not yet! I just got the
amp yesterday! Eventually, I may go for it. What you have done makes it
seem like a much more versatile amp, maybe the best practice amp ever. I
have also been looking at this mod pkg from a guy in England. Here's
the link if you want to check it out.
Epiphone Valve Junior mods, modifications and Power Scaling Valve Special
__________________
197? Yamaha SG700 1980 Kasuga 'Northern' LPC w/ T-Top & SD JB 1981 Vantage VSH-445 semi-hollow 1989 Yamaha Pacifica aka. TexMex Turdcaster 2005 Fender P-Bass Jr. MIM aka. 'Napoleon Bass-guitar' Free your mind, and your ass will follow-George Clinton 
|
|
|
|
|
05-19-2012, 12:17 AM
|
#23 (permalink) |
|
Senior Member
Join Date: Nov 2011
Location: Halifax, Canada
Posts: 762
Thanks: 32
Thanked 10 Times in 5 Posts
|
Re: Epiphone Valve Junior Mods
I bought all of the parts required in Mississauga including the
Output Transformer. I split my time between Halifax and Toronto so maybe
we can grab a coffee some time and go over the mods. PM me some time. .
.
__________________
Guitars: Epi LP '56 Goldtop (50's Wiring, SD SP90-2 Hot Bridge) Epi SG Goth (50's Wiring, SD SH-1 '59 Bridge, SD SH-6 Duncan Distortion Neck) Epi Dot Partscaster Esquire (Eldred Mod) CV 50's Pine Tele Fender Classic Series '50s Esquire
|
|
|
|
|
05-19-2012, 10:53 AM
|
#24 (permalink) | |
|
Senior Member
Join Date: Feb 2009
Location: North of Toronto
Posts: 3,878
Thanks: 70
Thanked 116 Times in 49 Posts
|
Re: Epiphone Valve Junior Mods
Quote:

__________________
197? Yamaha SG700 1980 Kasuga 'Northern' LPC w/ T-Top & SD JB 1981 Vantage VSH-445 semi-hollow 1989 Yamaha Pacifica aka. TexMex Turdcaster 2005 Fender P-Bass Jr. MIM aka. 'Napoleon Bass-guitar' Free your mind, and your ass will follow-George Clinton
|
|
|
|
|
|
05-19-2012, 11:23 AM
|
#25 (permalink) |
|
Senior Member
Join Date: Nov 2011
Location: Halifax, Canada
Posts: 762
Thanks: 32
Thanked 10 Times in 5 Posts
|
Re: Epiphone Valve Junior Mods
Total cost was approximately $75 with the OT being the bulk of the
cost. The expensive caps were the Mallory 150's at around $3 each. Time
spent was 3-4 hours spread over a couple of days.
You could do an awful lot of the important changes; filtering etc for less than $20 and an hour or two of your time.
__________________
Guitars: Epi LP '56 Goldtop (50's Wiring, SD SP90-2 Hot Bridge) Epi SG Goth (50's Wiring, SD SH-1 '59 Bridge, SD SH-6 Duncan Distortion Neck) Epi Dot Partscaster Esquire (Eldred Mod) CV 50's Pine Tele Fender Classic Series '50s Esquire
|
|
|
|
|
05-19-2012, 01:12 PM
|
#26 (permalink) | |
|
Senior Member
Join Date: Feb 2009
Location: North of Toronto
Posts: 3,878
Thanks: 70
Thanked 116 Times in 49 Posts
|
Re: Epiphone Valve Junior Mods
Quote:
__________________
197? Yamaha SG700 1980 Kasuga 'Northern' LPC w/ T-Top & SD JB 1981 Vantage VSH-445 semi-hollow 1989 Yamaha Pacifica aka. TexMex Turdcaster 2005 Fender P-Bass Jr. MIM aka. 'Napoleon Bass-guitar' Free your mind, and your ass will follow-George Clinton
|
|
|
|
|
|
05-19-2012, 03:26 PM
|
#27 (permalink) |
|
Senior Member
Join Date: Nov 2011
Location: Halifax, Canada
Posts: 762
Thanks: 32
Thanked 10 Times in 5 Posts
|
Re: Epiphone Valve Junior Mods
None of the mods are necessary strictly speaking
 The OT on the VJ is too small so any changes there have a pretty dramatic effect on volume and tone. There are two schools of thought; swap the OT first as it has the biggest impact on the overall tone of the amp, or fix the signal path and filtering first then decide if you want to swap the OT. There really is no right or wrong; only what you want to do given your budget. I have heard some sound clips showing excellent tone where the owner chose not to swap the OT. There are two OT's that are recommended by the experts over at SEWATT; Triode Electronics Classic Tone and the Hammond 125ESE. The classic tone is actually the preferred OT as it gives a smoother tone as it is less "Audiophile" than the Hammond. The Hammond is also more expensive but I chose it as I could source it locally saving the cost of shipping.
__________________
Guitars: Epi LP '56 Goldtop (50's Wiring, SD SP90-2 Hot Bridge) Epi SG Goth (50's Wiring, SD SH-1 '59 Bridge, SD SH-6 Duncan Distortion Neck) Epi Dot Partscaster Esquire (Eldred Mod) CV 50's Pine Tele Fender Classic Series '50s Esquire
|
|
|
|
|
05-19-2012, 04:53 PM
|
#28 (permalink) | |
|
Senior Member
Join Date: Feb 2009
Location: North of Toronto
Posts: 3,878
Thanks: 70
Thanked 116 Times in 49 Posts
|
Re: Epiphone Valve Junior Mods
Quote:

__________________
197? Yamaha SG700 1980 Kasuga 'Northern' LPC w/ T-Top & SD JB 1981 Vantage VSH-445 semi-hollow 1989 Yamaha Pacifica aka. TexMex Turdcaster 2005 Fender P-Bass Jr. MIM aka. 'Napoleon Bass-guitar' Free your mind, and your ass will follow-George Clinton
|
|
|
|
|
|
05-19-2012, 07:19 PM
|
#29 (permalink) | |
|
Senior Member
Join Date: Nov 2011
Location: Halifax, Canada
Posts: 762
Thanks: 32
Thanked 10 Times in 5 Posts
|
Re: Epiphone Valve Junior Mods
Quote:
I just realized I didn't write up the master volume or Tweed tone control; I'll do that tonight after work.
__________________
Guitars: Epi LP '56 Goldtop (50's Wiring, SD SP90-2 Hot Bridge) Epi SG Goth (50's Wiring, SD SH-1 '59 Bridge, SD SH-6 Duncan Distortion Neck) Epi Dot Partscaster Esquire (Eldred Mod) CV 50's Pine Tele Fender Classic Series '50s Esquire
|
|
|
|
|
 |
| Tags |
| None |
|
|


 25Likes


 Linear Mode


